
Types of Content
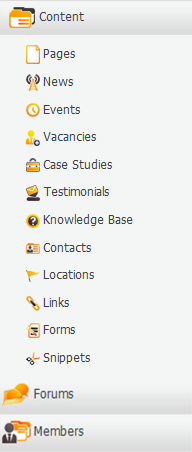
The Content submenu in WebCharge is all about adding web pages and adding specialised information to these pages. This information may be in the form of news, events, contacts and locations. The following tutorial shows you the capabilities of the content section within WebCharge and how to use it effectively.
Pages
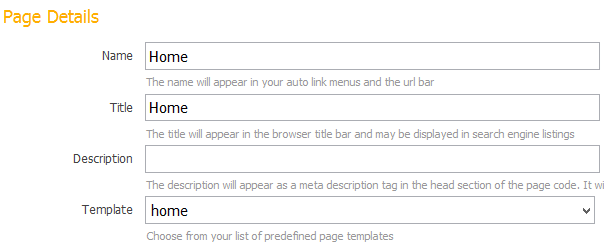
Pages are the building blocks of a website and are used to build up the main website content and the link structure. WebCharge allows you to simply add and edit the content in the pages for your website and style them accordingly depending on the template you select.
Your page can appear in all auto link menus, no auto link menus or within your sitemaps only. A sitemap provides a general top-down view of the overall site content.
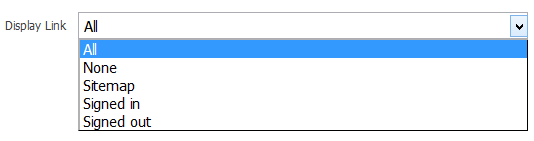
WebCharge allows you to specify how pages should appear to the users when members are signed in or out. This is useful if you want your content to only be available to specific people. When adding pages it’s important to structure your pages appropriately.
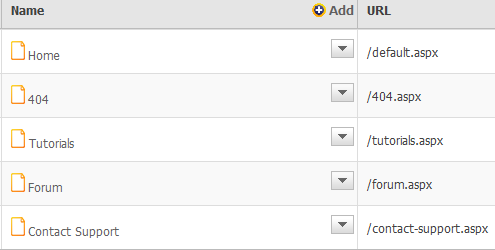
WebCharge allows you to create a web page within another. To do this, simply click on the page you want to create subpages underneath and create another page like you did before. In the example below, Tutorial 1 through 4 have been created after clicking the main Tutorials page in the image above.
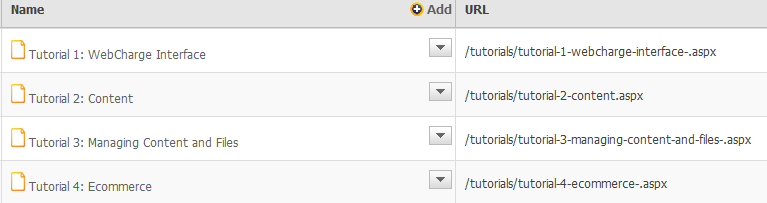
Subpages are important as they help ensure that search engines can find your website more easily.
News
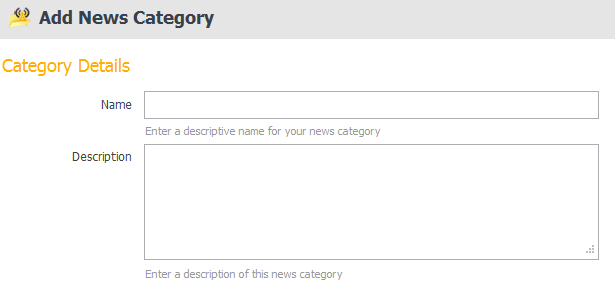
Creating news items in your website allows you to deliver important information to your customers. News items are date based content that can be included throughout a website. Within WebCharge, news items are grouped by category, and categories are used to display different types of news on different parts of the site. To manage news items, first create a news category and then within that category add news content.
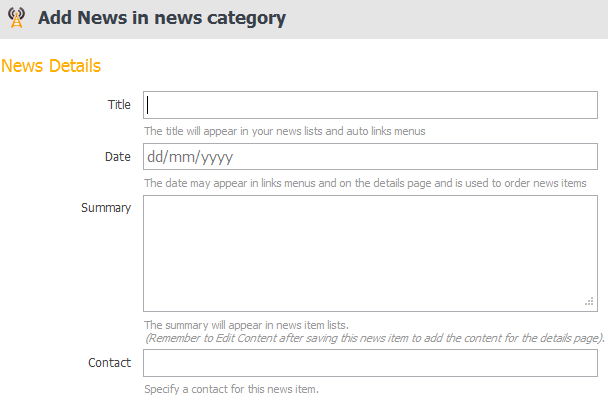
The news details form allows you to add a title, date posted and a summary which will appear in news lists. Once you have populated those fields, click save and then click details where you can add the full body content of your news article.
Events
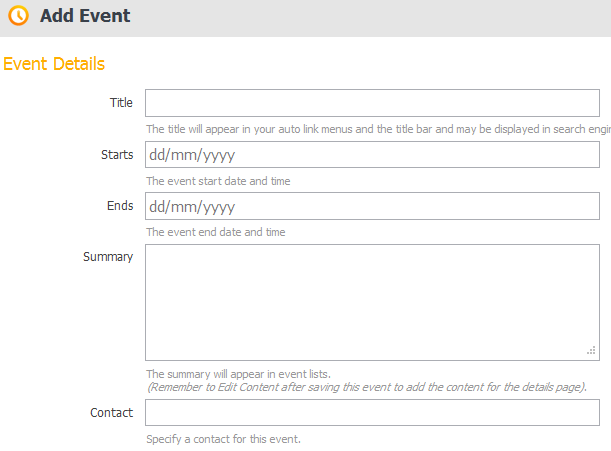
Like news, events are date and location based content that can be used to advertise and keep users informed of events, conferences and other types of meetings. You can simply add an event by entering the event details and event location details.
The events submenu also allows you to add a contact from the submenu so you can provide contact information without the need to retype another contact. Once you have created the event, you can view and edit the content of the events in the webpage at any time.
Vacancies
Vacancies can be used to display job vacancy information on a website. You can simply add a single vacancy by entering the form information or you can use the batch entry to add multiple vacancies quickly (Please see tutorial 3 for further information). The vacancies submenu also allows you to add a form to the vacancy.
For example you may wish to create an application form for the vacancy. Note: you must create the form in the form section first and then you can add the name of the form in the vacancy form section.
Case Studies
A case study is a descriptive, exploratory or explanatory analysis of a person, group or event. Case Studies within WebCharge can be used to publish project case studies or project profiles to the website.
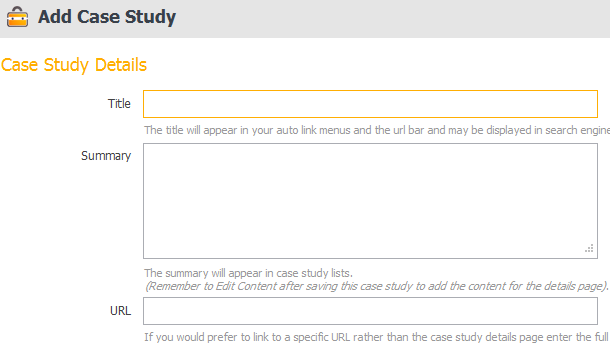
Case Studies appear in lists with a summary and an optional link to a full details page managed with the content editor. You have to edit the Content after saving this case study to add the content for the details page. If you would prefer to link to a specific URL rather than the case study details page, you can enter the full URL in the text field. Like most areas of WebCharge, you are able to set the case study to members only or all users.
Testimonials
A testimonial consists of a person's written statement extolling the virtue of a product or service. Visitors are often sceptical or hesitant to trust someone online so testimonials can be very powerful for helping to establish trust and encouraging visitors to buy, sign up, fill out a form, or take whatever action you are after.

This section is used to publish client testimonials or similar content throughout the website. Once you have opened up the testimonials section, click add to create a new testimonial. Once you've clicked add, you'll be taken to a page like the one in the image above where you can input the details of the testimonial and include an optional title for your testimonial. You can also include details of the person or organisation which has left the testimonial by filling in the sections under the Provided By header. Note: While you can manually enter the details here, if the contact details are already within the WebCharge system under Contacts, you can populate these fields automatically by typing in a name and choosing from the list of contacts that will pop up.
Knowledge Base
A Knowledge base within a website is commonly used to simulate a help desk. A Knowledge base is similar to an FAQ (frequently asked questions), and is designed to organise and present your most common questions or problems and gives an explanation of how to solve them. A Knowledge base may store troubleshooting information, how-to articles, user manuals, and answers to frequently asked questions.

WebCharge allows users to quickly add an FAQ and provide the relevant information, answering questions with ease. The title is where you can put your frequently asked question and will appear in your auto link menus. The content that you put in the summary will appear in the knowledge base lists. The full knowledge base item details is where you can write answers to your questions.
Contacts
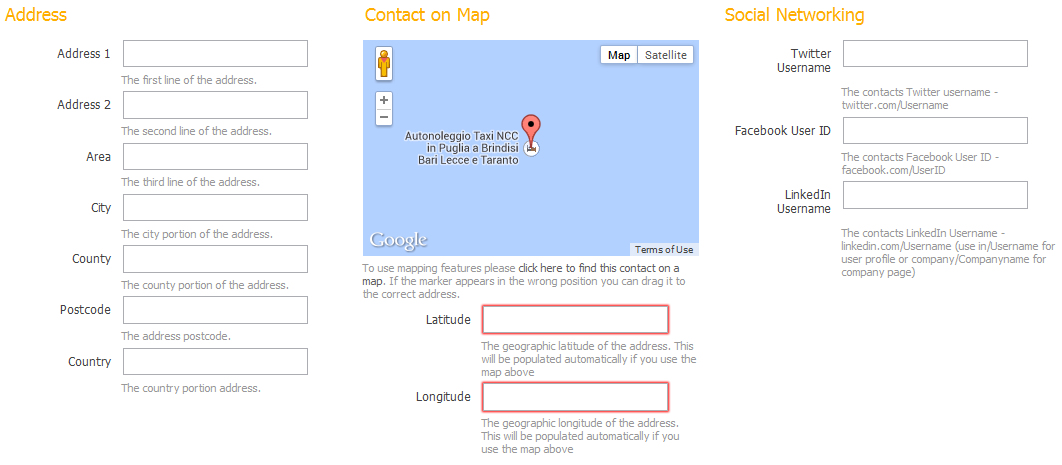
WebCharge allows you to manage your contacts effectively, and this section is used to store contact details within WebCharge. You can simply add a contact by entering the contact information in the form. The contact details allow you to provide a link to a social networking site to provide more information about the user. The contact sub menu provides you with a map of the contact's address so you can visualise the contact's address, which in turn, may help you make important decisions when you're delivering goods or services to your customers. When the address and postcode are entered in the text field, the longitude and latitude coordinates of the map are automatically created.
Locations
As discussed previously, you can provide and store location information into WebCharge. The locations tab can be used to provide you with a map and the contact address of a company, or any other type of location based information you want to provide to the user/customer. A Google Maps plugin is incorporated into WebCharge so when you input the location information into the details section of WebCharge, the geolocation will be mapped out.
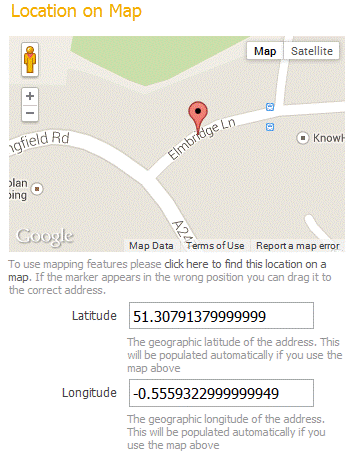
Once the location data has been added, you can click on the "find this location on a map" link below the map image and it updates the location accordingly. You can also manually move the pointer on the map if the automatically populated data isn't fully accurate. The map is found in a number of areas within WebCharge including contacts, vacancies and events.
Forms
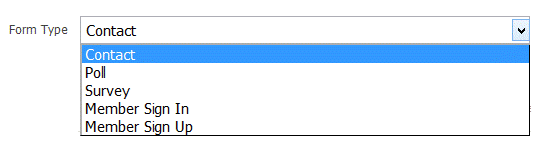
The form submenu allows you to create a number of different forms in a quick and effective way. WebCharge provides 5 form types.
You are then able to decide if you want a message to be displayed after the form has been confirmed or whether you want to be redirected to another page.

After creating your form, you are then able to add the form controls to the form you created by clicking on the fields tab next to your created form.
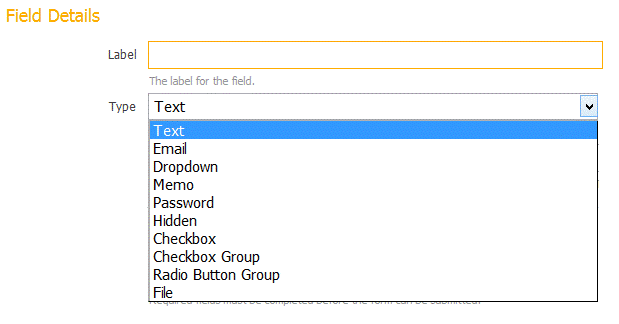
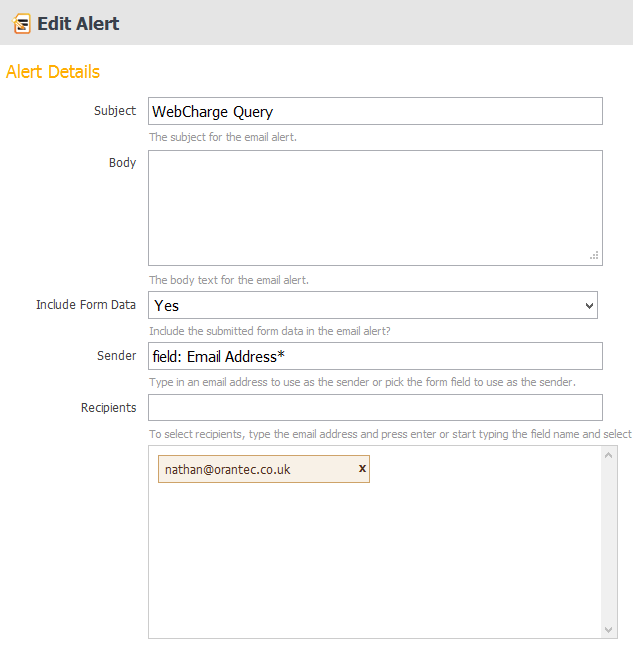
After selecting the label and the type, you are able to specify if this field entry is required within the form. Once a form is submitted you may want to alert some recipients of the data that was submitted through the form. You can do this simply by filling out the alert details and adding appropriate email addresses. The image below shows how to set up email alerts for people who want to receive notifications when forms are submitted.
WebCharge also allows you to manage the data that was submitted by the form, so you can see and edit the data accordingly.
Links
A link (or hyperlink) is a word, or an image that you can click on to jump to another document or web page. When you move the cursor over a link on a webpage, the arrow will turn into a little hand. As well as adding links in the content editor, you can build links through the Links submenu. The submenu allows you to create links to areas of your site or other external sites and also provides you with the ability to create linked images.

The title of the link will be the name of the link - so, if you're linking to a news story, the name of the news story would likely become your title. The description is what will be shown to the user - so, using the same example as before, if you're linking to a news article, the description could be a short summary of the story. The URL is the address of the page you want to link to, you should include the http portion if you're linking to an external site. If you are linking to internal pages, start typing the link location (page, blog, event, etc.) and choose from the suggestions that pop up.
Snippets
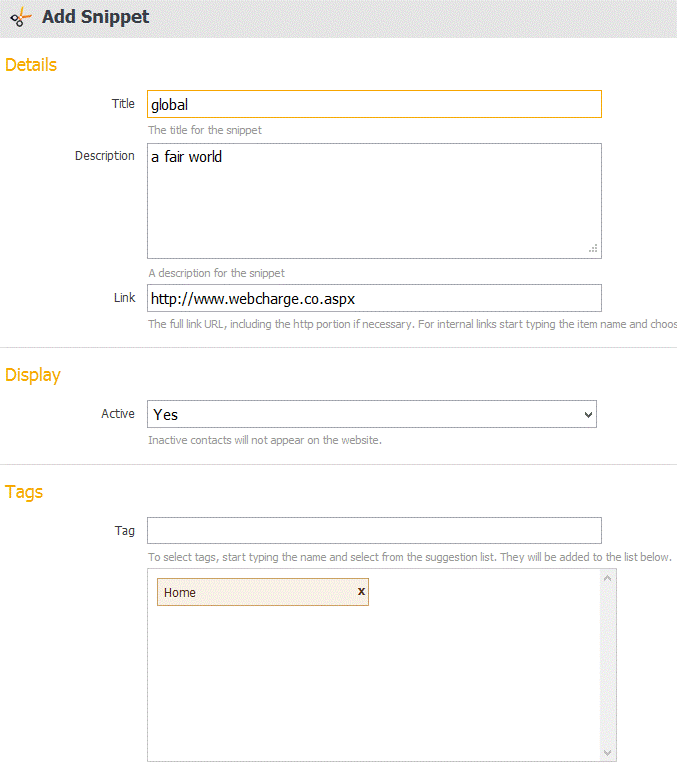
A Snippet allows you to create a section of editable content like a banner that can be placed throughout your site - for example a quote from a member of staff, or a banner linking to a piece of news or an upcoming event. To create a snippet, open the snippet section and populate the fields as shown in the image below.
Once you have populated the title and description fields, use the powerful WebCharge tagging feature to set where on your website you'd like the snippet to appear. In the example below, the snippet will appear on the home page.
Snippets are useful if you have frequently used content, such as banners or copyright information. By using snippets it will save time and help you to manage your content more easily.
Blogs
A blog is basically a journal that is available on the web. The activity of updating a blog is called “blogging” and someone who frequently updates a blog is known as a “blogger.” WebCharge blogs are calendar based, and are organised in a similar way to a diary. Blogs are very useful for all organisations as they can be used to easily post information on any particular topic and optionally allow users to respond with comments. Your company can use blogs to communicate and interact with customers and other stake holders. Blogs are also vital for SEO as they allow companies to frequently update the content offered on their website, a key ranking signal used by Google.

To create a blog, simply click on Blogs from the Content Pane of the WebCharge Interface and click Add. You'll then be taken to a page like the one above where you can add the blog's title and description (the description isn't always visible, and this will depend on your website settings). It is also vital to include a Meta Title and Meta Description to your blog as these fields are used by Google and will improve your site's search performance.

You can also set your blog to accept comments by anyone, members only or none by using the drop down box that will be highlighted once you click on Commenting.
Once you have finalised these settings, click save and then details where you'll be able to use the WebCharge editing system to populate the blog's body content and add links and images etc.
Forums
A forum is a discussion area on a website. Website members can post topics, ideas, stories etc. and read and respond to posts by other forum members. A forum can be focused on nearly any subject, allowing you to create an online community for your site.
Create forums to allow your users to communicate and collaborate. Fully featured forums can be created and managed with WebCharge including the option for post moderation. A moderator is a registered member of your forum that has additional "powers" that you assign. For example, they may be able to delete threads and warn members. WebCharge will also allow you to receive topic submissions via email.
Once you have created your forum you can add topics to your forum by providing a title and details to the topic.

The WebCharge Forum allows you to display the topic as a discussion or a Q&A. Discussions work like a standard forum, whereas Q&A forums allow members to reply to the question only once.

If you choose to moderate your forum, then all posts will go into the moderate section and you will have to activate or delete each post manually. As well as this, WebCharge allows you to directly post messages from your email account to the forum. The junk phrases in the Administration panel on the left allows you to filter out unwanted words from the email. All posts found to contain unwanted words are automatically moved to the junk items folder whereby you can then choose to activate or delete them.
Members
Your members are likely to be the most loyal customers to your site, so you can reward them with the opportunity to see information prior to non-members, or perhaps allow them to see information that non-members aren't able to see at all. You can reward your members by offering exclusive events that are only accessible to them, such as webinars, events or meetings. WebCharge offers a number of features that enable you to better manage your members. WebCharge allows you to group members together, allowing you to target groups instead of individuals, and it also allows you to group people together under eMarketing so you can be sure you're sending the right marketing materials to the right people.
The subscribers section allows you to group member together who have signed up to receive promotional materials from you, such as newsletters, discount offers or other forms of electronic marketing. Consumers may find subscriptions convenient if they believe that they will buy a product on a regular basis and that they might save money.