
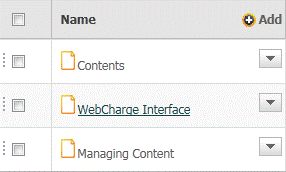
Managing Content
Content Lists

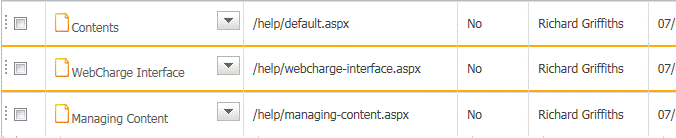
Viewing and managing content is done through Content Lists. Clicking a link in the Links Pane (on the left hand-side) will open the tab for that content type and the available content will be displayed in a list similar to that illustrated in the screenshot on the right.
Content lists appear in tabular format and display the main information for each item in the list along with the date and the name of the person who last edited the item.
At the very top of the list will be search fields for filtering the content in the list, along with an Archive tickbox for displaying archived items and an active tickbox for activating and deactivating content.
At the very bottom of each list is a paging row which provides tools for selecting how many items to display in the list and for moving between pages.
Managing List Items
The Content List provides convenient tools for managing list items.
In the title row of the Content List (usually in the second column) you will find the Add button. Click this to open the Add Item Form.
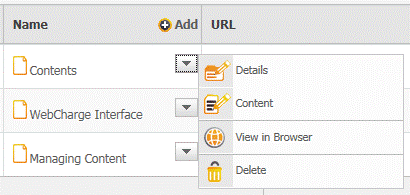
Within each row in the list (again, usually in the second column) is the Toolbox arrow which can be clicked to open the toolbox for editing individual items in the list. The tools that appear in the toolbox will depend on the type of content being viewed.
The content list also provides a convenient method of editing multiple items in one go. The first column of each row contains a tickbox that allows multiple rows to be selected and the tick box in the title row will select all rows in the list. In the footer of the list is a toolbox arrow that provides the tools for editing each of the selected rows in one go.
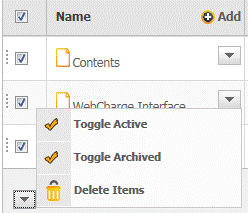
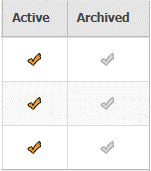
Another method of quickly editing content is through the quick tick columns. Columns displaying a tick can be clicked to apply or remove the action relating to that column, e.g. archiving items.
Where applicable, content lists can also be used to manage the order of items within the lists and their relative order within lists on the website. Items that can be reordered will have a gripper to the left of the row. Simply click this and drag the row up and down the list to change the item's position.
Hierarchical Content
With WebCharge it's easy to create a content hierarchy so that pages can be added within pages and documents within workspaces etc. To do this, wherever hierarchical content is allowed, you simply click on the name or title of the content within the list to open the sub content list. The sub content list will then open in a new tab and provide you with the tools for adding and managing content at that level.
Detail Forms
For almost all types of content there will be an Add button in the title row of the content list and a Details button within the toolbox for each item in the list. Clicking these buttons will open a WebCharge details form similar to that illustrated below.
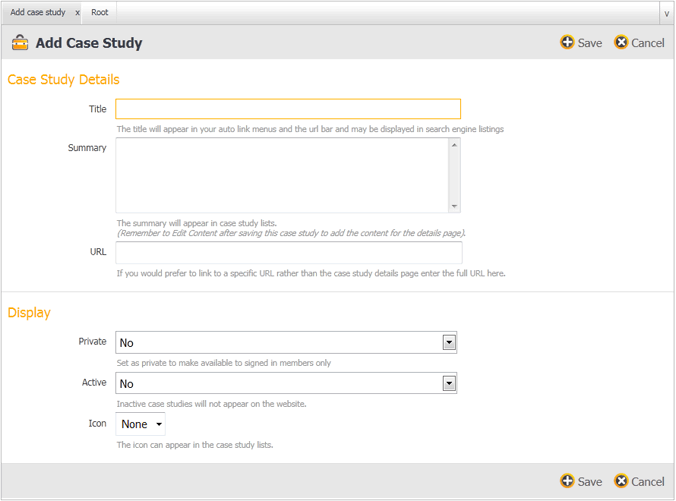
The details form will be split into convenient sections which groups together similar or related fields. The first section will always be the main details of the item being added or edited. The forms hold different types of input fields such as text boxes, memo boxes and select lists; underneath each field is a short description of the field or the content required. At the top and bottom of each form will be the save and cancel buttons. Upon saving, the submitted content will be validated and any errors displayed. Fields containing errors will then be highlighted orange.
Content Editor
 The WebCharge content editor provides a powerful rich text type
editing tool for managing the HTML content of relevant items. The
content editor will display the content being edited within the context
of the website so you can see how the content will be displayed on the
website as you are editing it. For convenience, and to help prevent
accidental mistakes, each page will consist of editable and non-editable
regions. The non-editable regions will be greyed out so they cannot be
edited and the editable regions will be signified by an orange dashed
border. Each page can contain multiple editable regions.
The WebCharge content editor provides a powerful rich text type
editing tool for managing the HTML content of relevant items. The
content editor will display the content being edited within the context
of the website so you can see how the content will be displayed on the
website as you are editing it. For convenience, and to help prevent
accidental mistakes, each page will consist of editable and non-editable
regions. The non-editable regions will be greyed out so they cannot be
edited and the editable regions will be signified by an orange dashed
border. Each page can contain multiple editable regions.The Content Editor form will usually show the title, keyword and description fields at the top with the content editor underneath allowing you to easily manage the full content of the page. At the top of the content editor is the toolbar containing buttons to aid with managing the content. These contain all the usual text formatting tools along with the following important and useful tools.
Insert a Link Button
Inserting
links is integral to managing website content and allows you to link
between pages and websites from the body text of your site. Links can be
applied to text or images simply by highlighting the relevant content
and clicking the insert link button  . This will open the insert link dialogue box that will appear directly under the highlighted content.
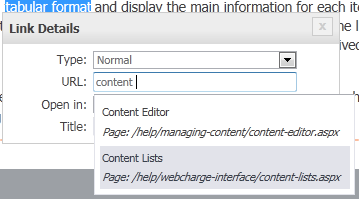
The dialogue box allows you to choose a link type (normal - a link to another web page, e-mail - open a new email message), specify the link URL, whether to open in the same or a new window and a title for the link. If you wish to link to internal content such as another page within the site or a PDF document simply start typing the name of the content in the URL box and select the content from the suggestions that appear as you type. When you are done, simply click out of the dialogue box and it will close and the link will be added. The link will be removed if the URL box is blank.
Insert an Image Button
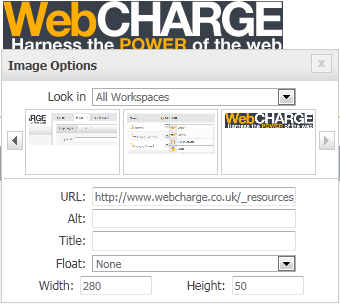
The insert an image button  brings up the insert image dialogue box and inserts the image at the
cursor position. The image dialogue box allows you to directly enter the
URL to the image or to browse for images that have been uploaded to
WebCharge through the Files area.
brings up the insert image dialogue box and inserts the image at the
cursor position. The image dialogue box allows you to directly enter the
URL to the image or to browse for images that have been uploaded to
WebCharge through the Files area.
Paste From Word Button
Pasting
from Word and other rich text editors can be problematic as the
formatting code specific to that software is also carried across. This
can cause all sorts of problems with the way the content is displayed on the
website and is also very detrimental for search engine optimisation. WebCharge
provides a convenient Paste from Word button which will automatically
strip out unnecessary code whilst retaining the formatting of your text.
Simply click the Paste from Word button  and paste the text into the window that appears (ctrl + V or apple + V)
and then click the insert button. The Paste from Word window also
provides tabs that will show you the difference between the pasted code
and the inserted code.
and paste the text into the window that appears (ctrl + V or apple + V)
and then click the insert button. The Paste from Word window also
provides tabs that will show you the difference between the pasted code
and the inserted code.
Edit HTML Code Button
If you are proficient with HTML, it can sometimes be useful to edit the HTML code directly. This can be easily done within the WebCharge content editor simply by clicking the Edit HTML Code button .
.